Whole Wheat Spaghetti with Lemon Cream Sauce

I love citrus season in Arizona – almost everywhere you look, there are lush green trees bursting with lemons, oranges, grapefruits and limes. It’s a deliciously welcome sight in the aftermath of the winter holidays and, well, to be honest I see it as free ingredients!

I walk my dog Marlow along a nearby canal and along the way, there is a huge lemon tree that hangs over the block wall fence. I first discovered it two winters ago and after passing by a few times that first week, I  realized that no one was picking the lemons on that side of the fence. What a sad waste of perfect fruit!  I quickly plucked a dozen lemons and realized that I hadn’t even made a dent in what must have been 40-50 lemons on just one side of that tree.

That year I used those lemons to make lemon rosemary cookies and lemon squares. Delicious, but this year I am on a healthier diet. I wanted to make an entree that also uses a little more lemon than a cookie dough calls for. It’s still technically winter, so a lemon cream sauce does fit the bill for a hearty dinner. After a lot of brainstorming and reading up on lower fat cream sauces, I came up with this lemon cream sauce recipe. I made it with whole wheat spaghetti to keep it healthier and rather than the typical broccoli or asparagus, I chose the sweetness of peas to compliment the slightly tart lemon cream sauce. The lemon and parsley give this dish a fresh and crisp taste, while the cream sauce, chicken and pasta maintain the heartiness of a winter dinner.

Now that I have my own brand new lemon tree in the backyard, I’ll be making this again and looking for some new ways to use fresh lemon!

Ingredients:

  • 8 oz. dry whole wheat spaghetti
  • ½ cup light cream cheese
  • 2 tbsp. olive oil
  • 2 tbsp. lemon juice
  • 1 tbsp. lemon zest
  • 2 tbsp. chopped parsley
  • 2 large boneless skinless chicken breasts, cooked and cut into bite-sized pieces
  • 1 cup peas

Directions:

Cook spaghetti according to package directions (when draining, be sure to reserve ½ cup of cooking water).

Melt cream cheese in a saucepan over low heat (make sure bottom doesn’t burn). Add olive oil, lemon juice and lemon zest.

Drain pasta, reserving ½ cup of cooking water. Stir reserved water into cream cheese mixture. In a large bowl, toss together pasta, chicken, peas, parsley and cream cheese mixture.

Honey Mustard for Your Honey

Happy Valentine’s Day! Even though I love all things pink, red, heart-shaped and sparkly, I’m not a huge Valentine’s Day fanatic. Oh, I sent some of my friends and family members the usual handmade Valentines, I’ll be wearing my red scarf all day and I’ll be making a special dinner for my husband tonight, but there will be no table scape dripping with hearts or romantic iPod mix playing in the candlelit background. I know. Perhaps I’m not as fun as you might have thought.

However, this IS a Valentine’s Day post – I swear! Honey mustard holds a special place in my husband’s and my romantic beginning. On our first date, he took me to a Phillies game (well, I guess here in Phoenix it’s considered a Diamondbacks game). The Phillies are my hometown team and I thought it was a great first date idea. We ended up talking through the whole game and he claims that we missed a grand slam because we were so into our conversation. Most of it consisted of him asking me questions about myself. Usual first date stuff. Not surprisingly, many of his questions pertained to food. At one point he leaned in close, looked me in the eye and asked, “How do you feel about honey mustard?” Lucky for me, I absolutely love honey mustard. Lucky for him, too, because as he tells it, this was a deal breaker question. It could be said that a second date and our entire future hinged on my feelings about honey mustard. Obviously I passed the test, but we still laugh about his blunt honey mustard inquiry. He says he was kidding about how important my answer was to him…but I guess we’ll never reallllly know.

In celebration of Valentine’s Day and all things sweet, here is my recipe for homemade honey mustard…the condiment that caught me my honey.

Ingredients:

  • 1 cup apple cider vinegar
  • ½ cup dry mustard
  • ¾ cup sugar
  • 2 large eggs
  • 1 ½ cup mayonnaise

Directions:

The night before:

Mix together apple cider vinegar and dry mustard and let stand overnight.

The next day:

Add sugar and eggs into the mustard and vinegar mixture.

Whisk the mixture and bring to a boil until thick.

Cool mixture and add mayonnaise.

Pour into a plastic condiment bottle and keep refrigerated.

Whole Wheat Turkey Lasagna

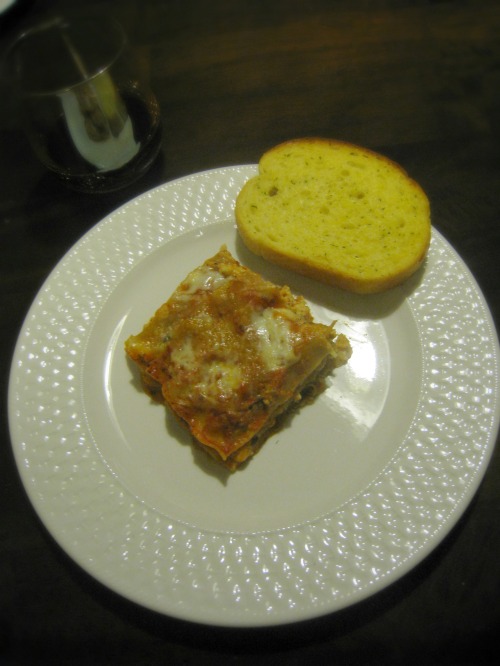
Believe it or not, this is the first time I’ve ever made lasagna. I’ve always liked it, but it seemed like a lot of fuss for something that was made out of noodles and ground meat. Though out of sheer boredom from including penne, rigatoni or ziti in my weekly menus, I decided to give it a try.

My husband and I  agreed that it should be a healthier version, meaning substituting regular noodles for whole wheat noodles and ground beef for ground turkey. That being said, I used whole fat cheeses in order to keep most of the flavor and richness for which lasagna is known (and craved). In order to come up with this recipe, I stitched together a few different ones that I  came across online, from my best friend and on the back of the lasagna noodle box. I think it works really well and my husband likes it so much that he eats the leftovers for lunch, a snack and dinner the next night!

P.S. The garlic bread is the Texas toast from – Walmart! It’s pretty much the only thing I go to Walmart just to get. It’s in the specialty bread section and here in Phoenix it’s about $4 for a double loaf of it.

Ingredients:

  • 1 box whole wheat no-boil lasagna noodles (15 noodles)
  • 1 lb. ground turkey
  • 1.5 jars pasta sauce
  • ½ cup water
  • 15 oz. tub ricotta cheese
  • 2 cups shredded mozzarella
  • ¼ cup freshly grated Parmesan cheese
  • 2 eggs
  • 2 tsp. chopped oregano
  • 2 tsp. chopped basil
  • 1 tsp. salt
  • ½  tsp. garlic powder
  • ¼ tsp. ground black pepper

Directions:

In a large skillet brown ground turkey.

Stir in 1 jar of pasta gravy, simmer 10 minutes, but don’t cook off too much of the sauce.

Heat oven to 350 degrees F.

In a large bowl, stir together ricotta cheese, 1 ½ cups mozzarella cheese, Parmesan cheese, eggs, oregano, basil, garlic, salt and pepper.

Spread about 1/3″ of pasta gravy in the bottom of a 13×9 glass baking dish. Arrange 3 lasagna noodles vertically over sauce, overlapping edges.

Spread 1/3 cheese mixture over noodles, then spread about ¾ cup of the meat/gravy mixture.

Repeat layers, beginning and ending with pasta. Top with remaining meat/gravy mixture, sprinkle with remaining ½ cup mozzarella cheese and add additional Parmesan cheese is desired.

Cover with foil. Bake 45 minutes or until hot and bubbly. Remove foil and bake for about 10 min. longer, or until lightly browned. Let stand 10 minutes before serving.

Serve with a Caesar salad, Texas toast and a glass of wine! You also can bake in two separate loaf pans (just split the ingredients and do layers of two noodles lengthwise in each loaf pan) and freeze one for a future meal.

Single Serving Nutella Cheesecake Cups

I suppose I should be posting something Super Bowl-themed. Something smothered in hot sauce, cheese and/or chili. But that’s the beauty of blogging. It’s not a magazine that’s bound to an editorial calendar and government holiday themes. That being said, I think this dessert could fit nicely into a Super Bowl menu to satisfy your sweet-toothed guests.

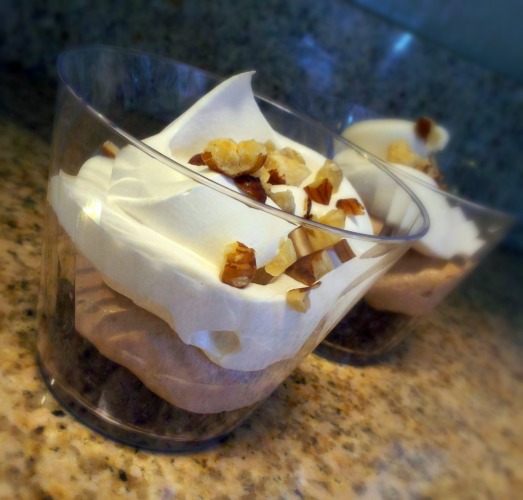
My husband’s office has (another) potluck lunch today and I needed something easy, able to be made in mass quantities (20-25), easy to transport and fun to eat. I originally saw this recipe on the My Baking Addiction blog and thought it would be perfect. I was introduced to Nutella last year when I took an Italian class to prepare for my honeymoon to Italy. After being out of school for so long, I had forgotten that one of the perks of a language and culture class was sampling the food! When I saw that this dessert used Nutella, I  had to try it.

If I could describe this dessert in one word, it would be decadent. It’s got texture – the dense cookie crust on the bottom, the whipped nutella, whipped cream and cream cheese in the middle and the crunchy chopped hazelnuts on top. It’s super sweet with the edge and richness of the cream cheese throughout. And it’s almost whimsical with the peaks of whipped cream adding height like the turret of a castle. I used disposable clear plastic cups to serve them in since my husband was taking them to work. I also could see them being served in shooter glasses, those miniature tasting bowls, juice glasses or pretty colored glass votive candle holders (sans the wax, of course). I also think that this is the perfect excuse to buy a set of those mini tasting spoons – so cute! Regardless of the way you serve them, I suggest keeping the serving size on the small side. These little guys are packed with icky sticky, ooey gooey sweetness.

I know because I  had one for breakfast this morning. Have a great weekend and may your Super Bowl pick be victorious!

Ingredients:

For the Crust:

  • 24 Oreo Cookies, crushed into crumbs
  • 6 tablespoons unsalted butter, melted

For the Filling:

  • 2 (8 ounce) packages cream cheese, softened
  • 1 1/3 cups Nutella
  • 2 tsp. pure vanilla extract
  • 1 (large 16 oz.) tub frozen whipped topping, thawed

For the Garnish:

  • 1 (8 oz.) tub of whipped topping, thawed
  • Toasted, chopped hazelnuts, optional
  • Chocolate shavings, optional

For Serving:

  • Small clear plastic cups or glass bowls
  • Small tasting spoons or plastic spoons

Directions:

In a medium bowl, stir together the crushed Oreo cookie crumbs and melted butter. Evenly divide the crumbs between the individual cups and press into the bottoms of the cups to form the crust layer.

In a large bowl beat the cream cheese and Nutella until smooth. Add the vanilla extract and stir to combine. Then fold in the whipped topping until well blended and no streaks remain.

Evenly pipe or spoon the filling into individual serving dishes (I just used a Ziploc baggie and cut one corner. I liked the thickness of the piping. Bonus: I just tossed the bag in the garbage when I was finished!). Cover with plastic wrap and refrigerate for at least 2 hours before serving.

Pipe whipped topping into each up and sprinkle on the toasted hazelnuts. You also could add chocolate shavings if you have a giant sweet tooth!

Easy Tortellini and Spinach Soup

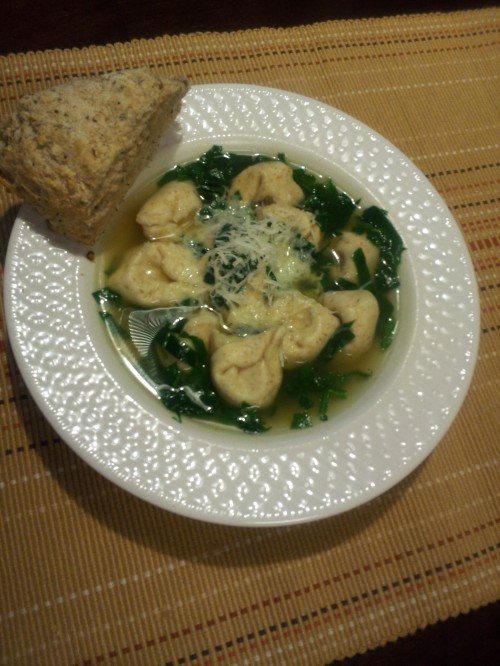
Tortellini and Spinach Soup

This soup seemed so easy to make that I almost didn’t make it. It’s cheating, I thought to myself. I can barely consider it homemade. I certainly couldn’t blog about it. It looked so delicious that I  decided to make it, but I vowed to keep it my own shameful secret.

Though I  can keep a secret, I obviously didn’t want to keep this one! It was so good that my husband and I had to play paper rock scissors to see who got the last bowl. It’s the perfect dinner soup to get you through the winter blahs and to fill your belly with something warm and delicious.

This soup is from my Williams Sonoma soup book, but coincidentally, their blog featured it last week. They use tri-colored tortellini and escarole, but I went the healthier route and used whole wheat tortellini. I also chose spinach over escarole and I really like the texture and flavor of it better.

Ingredients:

  • 6 cups chicken broth
  • 9 ounces fresh tortellini (I use whole wheat tortellini)
  • 1 medium bag of baby spinach leaves (6 to 8 ounces)
  • Salt and freshly ground pepper
  • 3/4 cup grated fresh Parmesan cheese

 Directions:

In a large heavy pot bring the broth and 2 cups water to a boil over medium-high heat. Reduce the heat to medium, add the tortellini, cover and cook until al dente, 4 to 5 minutes, or according to the package directions.

Meanwhile, coarsely chop the spinach leaves into strips.

When the tortellini are done, add the spinach and season with salt and pepper. Simmer, uncovered, until the spinach soft, about 2 minutes. Serve garnished with the Parmesan.

Quick BBQ Pulled Chicken Sandwiches

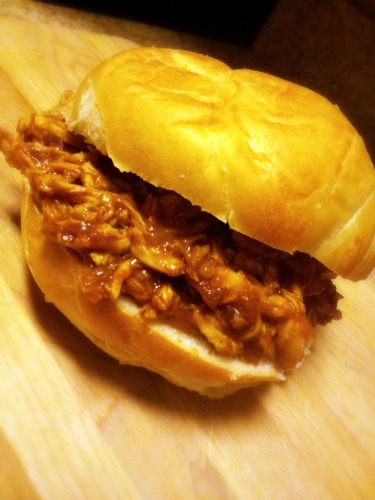
A few weeks ago, I had a craving for BBQ chicken. It was 5:30 p.m. – wayyyy too late in the game to slow cook it in a crock pot. Not even fathomable to wait until the next day to make it. I wanted BBQ and I  wanted it now. Luckily, I came across Rachael Ray’s version and, woo hoo! – it could be done in under an hour!  I was skeptical about making a pulled chicken sandwich in just 55 minutes, but I was BBQ-desperate and decided to give it a try. While this recipe is kinda sorta cheating and probably makes the BBQ authorities cringe, I thought it came out delicious and it certainly satisfied my craving. A plus was that the chicken (I used boneless skinless chicken tenderloins, the kind that come frozen in a bag) literally fell apart when it came time to pull it apart with two forks. That was my first clue that Rachael was steering me in the right direction with this one. Therefore, I am pleased to post this recipe (with a couple of modifications) for all of you who need a quick BBQ fix now and again!

Ingredients:

  • 4 boneless chicken breast halves (I used about 8 large frozen chicken tenderloins), thawed
  • 1 medium onion, finely chopped
  • 4 cloves garlic, finely chopped
  • 1-1/3 cups barbecue sauce
  • ½ cup apple cider vinegar
  • Hot pepper sauce
  • Salt and pepper
  • 6 whole wheat kaiser rolls
  • Optional – 6 oz. shredded Monterey Jack cheese

Directions:

Season the chicken with salt and pepper and place in a heavy pot with the onion, garlic and just enough water to cover (about 1-1/2 cups). Add the barbecue sauce, vinegar and a few drops hot sauce and bring to a boil. Reduce the heat and simmer until the chicken is cooked through, about 15 minutes.

Remove the chicken from the sauce and shred with two forks.

Boil the sauce, skimming occasionally, until reduced by half, about 15 minutes. Season with salt and pepper. Add the shredded chicken and heat through. Spoon the mixture onto the rolls and top with the cheese (optional).

Perfect Party Pizza

Happy New Year! I know, I know, it’s Jan. 13 and I’m posting my first recipe of the year 13 days in because on New Year’s Eve I came down with the World’s Worst Cold. Then – surprise – my husband caught it. Sometime last week, while on a Theraflu/Tylenol high, I offered to cook dinner when my father-in-law came to visit us last weekend. Thank goodness for the NFL playoffs! Playoffs are the perfect excuse to make laid back finger foods – like I am doing everyone a huge favor by thoughtfully and selflessly preparing the easiest foods I can think of!

Did you know that I worked at a family-owned pizza shop for eight years? Pizza still is one of my very favorite foods, but I am very, very choosy about what constitutes good pizza. Here is my easy, but delicious, method of the perfect party pizza. Keep on reading below the recipe – I’ve put together some quirky and creative pizza ideas for your parties this year. They are perfect to serve at your academy awards party, your book club meeting, your Valentine’s Day dinner (think heart-shaped pies), your girls’ night in or your ladies poker night.

And, in case you’re wondering, YES. Yes, I can toss my pizza dough into the air and catch it.

Pizza Dough: I used Safeway pizza dough and I thought it was great. Trader Joe’s also makes a good one. You also can usually buy fresh pizza dough from your local pizza shop for a couple of dollars. For the pizzas pictured above, I used half of a pizza dough for each one. This works well if you want to make a variety of pizzas for your guests to sample. For a family dinner, you can make one large pie.

Pizza dough tips: Keep your dough cold in the refrigerator. Take it out a few minutes before you’re ready to use it, but don’t let it warm to room temperature. It becomes gooey and thin and difficult to work with. You want a cool workable, dough.

Basic Pizza Sauce:

Ingredients

  • 1 ½ tbs. olive oil
  • 1 clove of garlic, minced
  • 1 14 oz. can roma tomatoes, drained and diced
  • ½ Tsp. oregano
  • ½ tsp. basil
  • ½ tsp. pepper
  • ¼ tsp. salt
  • 1 pinch sugar (add more to taste)

Directions:

Heat oil and brown garlic. Add tomatoes, oregano, basil, salt, pepper and sugar. Add more sugar for a sweeter sauce. Cook over medium heat for 15 minutes until sauce thickens.

Pizza Sauce Tips:  I doubled this recipe to make the four smaller pizzas. I had just enough sauce for all four. If you like a saucier pizza, I suggest either making more of this recipe or buying grocery store pizza sauce (this is different than spaghetti sauce), which is a thicker saucier consistency, rather than the chunkier consistency of my homemade sauce.

You can make your sauce ahead of time since it will heat up when you cook your pizzas. This can be a time saver that allows you to spend more time with your guests!

To make your pizza:

Start with a cold pizza stone in a cold oven. Preheat your oven with the stone in it to 500 degrees (your stone could crack if you place it into a hot oven).

Prepare a lightly floured work surface. A baking mat or parchment paper held down with scotch tape works well. To make smaller pizzas, cut the dough in half, using one cut through the middle. Cover your entire pizza dough lightly with flour. Take one half of the dough and using the pads of all of your fingers, press down and outwards in even strokes. This will start flattening and spreading your pizza crust. Do this evenly over the whole surface – this will help prevent air bubbles from rising up and pushing away your sauce and cheese while it cooks. Try to maintain and form a round shape while you’re doing this step. Do not fold or cut dough into pieces to attempt shaping. This will make your dough uneven and will cause tears in the dough when you are ready to stretch it.

Next, pick up the dough and without stopping, run your pointer finger and thumb around the edge of it and pinch down lightly, while rotating it through those fingers with your other hand. This forms the pizza’s crust. Your fingers should slide easily over the dough since it is covered in flour. Make sure you’re sliding the dough, not pulling it.

Next, make two fists (you may want to throw a bit of flour on top of your knuckles). Sit the dough on top of your left fist, while using your right fist to rotate the dough in a circle and lightly stretching it outwards. This will expand your dough to its actual pizza pie size. Make sure to keep the dough rotating at all times. Remember to use fluid stretch/rotate motions and don’t pull or tug. Letting the dough sit on your fist will cause it to fall through and you’ll have a huge hole in it. Using fluid motions will result in evenly stretched dough.

At this point, you may have some thin spots or even some tears in your dough. It should be ok. Don’t re-roll your dough and start over. Put your dough down on your lightly floured pizza peel. If you have any tears, you can stretch one side of the tear over to cover the hole. Press down to adhere. You may also use a bit of water to make the dough stick together. Don’t leave any tears in your dough. While cooking, the sauce will bleed through and your pizza will stick to the pizza stone and rip when you try to remove it.

Cheat alert: In lieu of the stretch/rotate step above, you can use a lightly floured rolling pin to flatten your dough. This might be safer for a beginner, but there will be a difference in the texture and consistency of this pizza crust versus the hand-tossed pizza crust.

Use a ladle to spread sauce on your dough in a circular motion, working from the center, out to the start of the crust (this is the seam that you created when you pinched around the edge of the dough earlier).

Sprinkle shredded mozzarella cheese over the sauce. For a margherita pizza, use slices of fresh mozzarella. Add any toppings on top of the cheese.

At this point, you can slightly adjust the shape of your pizza. It will stay better with all of the toppings on it. To make a heart-shaped pizza, use your finger to make a dip in the top center. Then, lightly push in the sides to make the bottom point of the heart.

Pick up your pizza peel and tilt the handle upwards and shimmy it lightly to transfer the pizza onto your pizza stone in the oven. Cook until the cheese is melted and your crust is cooked to your desired crispiness.

To remove your pizza from the oven, position your pizza peel at the bottom of it and use two fingers to pull the pizza by the crust onto the peel. Do this quickly and use your fingertips so you don’t burn yourself. Transfer your pizza onto a pizza tray or a cutting board and slice immediately.

Remember to lightly flour all surfaces again when you make each pizza. Don’t use too much, though, or you’ll have a layer of flour on the bottom of your pies.

Making the perfect pizza takes practice! Working with the dough is an art and getting your sauce right, the perfect amount of cheese and cooking it to the perfect amount of crispiness all take practice. Don’t get discouraged and have fun!

As promised here is a list of some quirkier pizzas you can try.

Breakfast pizza: pizza sauce, mozzarella cheese, scrambled eggs and bacon

Buffalo chicken pizza: pizza sauce, mozzarella cheese and cut-up chicken tenders soaked in hot wing sauce. Try dipping your slice in bleu cheese dressing as you eat it!

Cheeseburger pizza: pizza sauce, mozzarella cheese, ground beef, sliced provolone cheese and diced onion

Chicken and broccoli alfredo pizza: pizza sauce, mozzarella cheese and chicken and broccoli tossed in alfredo sauce

Fig and goat cheese pizza: olive oil, minced onion, dried figs, chopped thyme, goat cheese

White pizza with tomato and broccoli: olive oil, minced garlic, mozzarella cheese, sliced tomato and broccoli

Homemade Hanukkah Applesauce

Happy Hanukkah! My husband is Jewish and last night for dinner I made latkes (potato pancakes), along with some some other traditional Jewish food. Admittedly, my husband didn’t grow up with any strong religious traditions, but he really appreciates that I make sure Hanukkah doesn’t get lost amongs my (many) Christmas celebrations.

Confession: since I’m not too familiar with making or eating latkes, mazo ball soup, challah bread and blintzes, I either made these things from a box recipe or I bought them fresh from a bakery. However, I wanted something to be made from scratch, so the applesauce it was! I also was delighted to find out that I already  had all of the ingredients right here at home. This applesauce took a few guesses, but I was familiar with the basics. I thought it came out great and my husband actually asked me to make more just to have as a snack!

Note: you can adjust the amounts of sugar and cinnamon depending on the kind of apples you use and how sweet you want it to be. To make a creamer applesauce rather than a chunky one, which I  like, use a food processor or hand mixer instead of a potato masher.

Ingredients:

  • 4 apples, peeled, cored and chopped
  • ¾  cup water
  • ¼ cup granulated white sugar
  • ½ tsp.  ground cinnamon

Directions:

In a large pot add all ingredients. Cover and cook over medium heat for about 20 minutes or until apples are very soft. Remove from heat and let cool. Drain water and mash with a potato masher. Refrigerate until ready to serve.

Spinach, Pear and Shaved Parmesan Salad

I love planning dinner party menus. Putting together a fun and unique combination of appetizers is always enjoyable and there are so many from which to choose. The entree requires a bit more thought, but it’s definitely the “meat” of the menu (no pun intended) and you know when you’ve found “the one.” The sides follow easily after that. And deciding on just the right dessert is – let’s face it – the icing on the cake. But for some reason, I seem to get stuck on the salad course. It’s always always the very last thing I add to my menu. I always change my mind a few times. I’m not sure why this is. Is it because I’m so clever and intuitive as to how a salad course should compliment and build up to the entree and dessert that I wait until last to decide? Probably not. Is it because so many salad courses include cheese and nuts and I’m a sensitive hostess who takes all potential food aversions very seriously? I do, but really, that’s not why. Is it because the dinner salad, put simply, just isn’t the sexy part of the meal? Perhaps.

This is where I got stuck last Thanksgiving during my menu planning. I had chosen a bean and kale salad at first – and  just typing those words makes me thankful that I  gave it a second thought. I finally found this spinach, pear and shaved Parmesan salad on BHG.com and I had that menu-planning Eureka! moment. And it didn’t disappoint. It’s so easy to make and it looks so beautiful on the dinner table. The tart mustard dressing is a perfect pair with the sweet slices of pair.

If you’re still stuck on your salad course for this weekend’s big dinner, I hope that this can maybe be your Eureka! menu moment.

Ingredients:

  • 8 cups fresh baby spinach
  • 1 Bosch pear, quartered lengthwise, cored and thinly sliced
  • 2 oz. Parmesan or Parmesano Reggiano cheese, shaved (you can do this ahead of time with a vegetable peeler and room temp cheese)
  • 2 tbsp. balsamic vinegar
  • 1 tbsp. whole-grain mustard
  • ½ cup extra virgin olive oil
  • 1 tsp. sugar
  • 1 tsp. salt
  • ¼ tsp. freshly ground black pepper

Directions:

Combine spinach, pears and cheese. For dressing, whisk together vinegar, mustard, salt, pepper and sugar. Whisk in oil. Drizzle on salad and pass remaining.

Makes eight servings.

Brie Topped with Pralines

I don’t know about you, but I can’t get through the holidays without ridiculous amounts and variations of cheese dishes. If it’s super easy to make – even better. If it’s sweet and topped with nuts – even better. If it’s perfect for spreading onto a slice of crusty bread or a crisp tart wedge of apple – even better. This is the ideal appetizer with which to start your holiday party or dinner. It’s quick, it’s decadent and it’s sure to get the conversation started since people tend to stand around the plate because one taste of this just is not enough!

Ingredients

  • 1  13-ounce  round Brie or Camembert cheese
  • 1/2  cup  orange marmalade
  • 2  tablespoons  packed brown sugar
  • 1/3  cup  coarsely chopped pecans, toasted
  • Apple slices and/or baguette slices, toasted

Directions

Preheat oven to 350°F. Place cheese in a shallow ovenproof serving dish or pie plate. In a small bowl, stir together orange marmalade and brown sugar. Spread on top of cheese. Sprinkle with pecans.

Bake for about 15 minutes or until cheese is slightly softened and topping is bubbly. Serve with the apple and/or baguette slices.